


So you got an Instant Pot for Christmas. Now what?! Other than the “water test”, where do you start, right? (And if you don’t know what the water test is, then you aren’t the instruction manual reading type and you desperately need this article. Just sayin’.)
 You’re going to love your Instant Pot the most if you learn how to use it properly from the beginning. Only a few failed “trial and error” attempts could leave you with lackluster feelings for your new toy, and we just can’t have that. I can’t cook worth a darn, but I am a total “pot head” now. If I can make this look easy, so can you! Here are some insights to help you rock that pot.

It takes longer to cook than they claim.
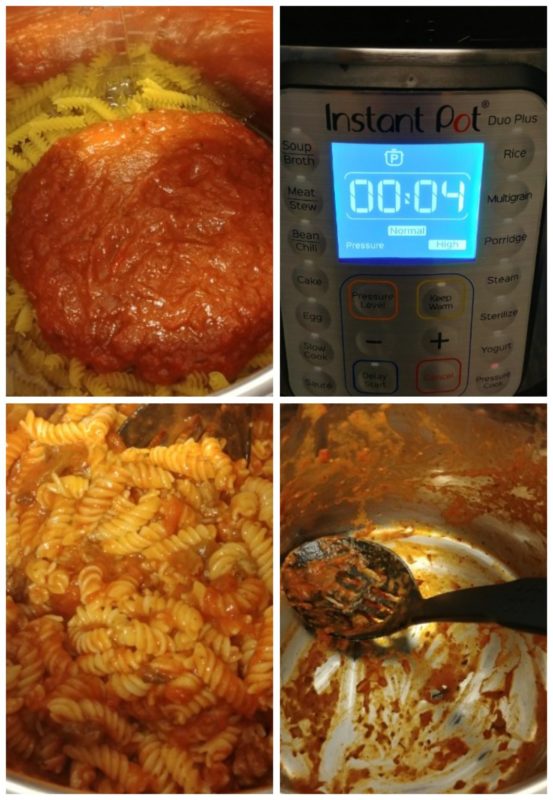
The times people brag about are total baloney. I mean, technically they are telling the truth, but you aren’t making pasta in 4 minutes or ribs in 10. The time you set is the cooking time, which doesn’t start until the pot comes to pressure. The amount of time it takes to build up pressure inside the pot depends on a few factors like how much food you put in, the temperature you started with, etc. So if I throw frozen meatballs in with my spaghetti, it’s going to take longer to come to pressure than if I used only room temperature sauce and hot water. The reason the pot is so awesome is that I don’t have to adjust the math for those two extremes. I always put my pasta in for 4 minutes, regardless of what else I’ve added or how many servings I’m making. No second guessing how long to set it for, even though estimating total cook time takes a little practice.
You need liquid to make the magic happen.
The liquid is what makes the steam, which is what builds the pressure. You need at least a cup of liquid in the bottom of the pot, no matter what. That can be water, broth or a thin sauce. If you are making something you don’t want sitting in the liquid – or something you don’t want sitting directly on the bottom of the liner (rice can be tricky) – the “pot in pot” method is great. The Instant Pot comes with a trivet, which is a short little rack you can use to keep stuff off the bottom if you need to. You can use any oven-safe dish, aluminum foil, or even those disposable cooking pans. It won’t be long before you want other gadgets like steamers, stackers and cheesecake pans that fit inside the pot.
Facebook is riddled with groups focused on pressure cooking. Find a few and follow them. I discourage “winging it” with the Instant Pot until you have some practice. You’ll have a better experience if you start out with tried and true recipes with clear instructions.
- I like this Recipes Only group, where it’s all about the food and not about the appliance. .
- If you are new to Instant Pot and want to learn more about using it as a tool, join the official Instant Pot Community.
- We also follow groups for specific dietary needs like Gluten Free or Vegan pressure cooking.
I appreciate that all my stuff is in one pot and doesn’t require babysitting. This is the real game changer for me. I get stressed when I have to juggle multiple dishes and cook times; and I’m easily distracted, which results in a lot of burning when I cook the old fashioned way. The Instant Pot doesn’t require supervision, because what would you watch anyway? Once it’s sealed, there’s not much you can do to check on it or tweak what’s in there.
The other day I was forced to make pasta “the regular way” for the first time in 6 months. I hated my life. I had to watch for the boil, remember to add the pasta, stir, keep testing it to see if the texture was right. I had another pot of sauce going. I was microwaving then sautéing frozen meatballs. I broke a sweat juggling it all and had half a dozen dishes to clean. In my Instant Pot, it goes like this:
- Dump in meatballs (fresh or frozen, doesn’t matter)
- Dump in a box of dry pasta
- Dump a jar of sauce on top
- Refill the jar with water and pour it in (off to the side a little so it doesn’t wash the sauce down to the bottom of the pot but rather just soaks the pasta underneath – don’t stir!)
- Close the lid, set to Cook for 4 minutes
- Walk away with my glass of wine
When the timer goes off, it’s perfect. Every. Single. Time. One pot. One spoon. Where has this been all my life?
I have the 6 qt Instant Pot Duo. There are “program” buttons like poultry and stew; but these actually just set the cooker for an appropriate amount of time, as opposed to doing something different than “manual” cooking. Manual just means you hit the Pressure Cook button and choose the minutes yourself. The three buttons that really perform something different are:
- Saute: This differentiates the Instant Pot from your crock pot. You can brown meats and soften your veggies before kicking off the main cooking process, which is great for flavor and texture without dirtying another dish.
- Slow cook: This eliminates the need for a crock pot, it does the same thing. Bonus, you can set the time to cook and then move to “keep warm”, if you don’t really want it cranking on full heat all day.
- Yogurt: Yes, this really works and it’s awesome. There’s a complicated approach with boiling and cooling and blah, blah, blah. Lazy moms like me choose the no-boil method, which requires Fairlife Milk and a tablespoon of starter (basically a spoonful of yogurt from the store for your first batch, or the pixie dust inside a few probiotic capsules). 8 hours later – awesomeness! This may also drive a desire for a strainer. I bought a cheap reusable coffee filter from Publix. This step makes for thicker yogurt but is not required.

You should set your vent to “sealing” to pressure cook. Every recipe will specify the way to release the steam when it’s done.
- QR = Quick Release. That’s where you toggle the vent to open and let the steam rocket out like a freight train. Be sure to use a towel or pot holder…because steam.
- NPR = Natural Pressure Release. This means you don’t move the vent nozzle, you just let it sit until the pin drops on its own. This obviously takes longer, maybe 10 minutes, so account for that in your meal planning. 90% of what I cook is QR. I’m not big on patience.
When something goes wrong, it’s almost always the detachable cord has come unplugged from the back of the base, the rubber ring isn’t seated in the lid properly, or you haven’t set your vent to sealing. If you get the “burn notice”, the problem is almost always that you didn’t use enough liquid or put something on the bottom that scorched. Tweak those things before you give up or assume it’s broken. Having said that, I really did blow a fuse in mine last month. I called the company and they sent me a new base super quick, zero hassle.
Don’t EVER set your Instant Pot on the stove. I don’t know what compels people to want to do this, but I have seen countless stories of this habit leading to disaster when someone accidentally turns a burner on. Once you melt the bottom of your pot, it’s toast. And since the company will require a picture of the sticker on the BOTTOM of your pot for any warranty claims, you are out of luck if you’ve fallen into the stovetop trap. Just put it on your counter where it belongs.
Sarah’s hot tips:
- Fold a long strip of aluminum foil and run it under your containers like a sling. It can stay in there while it cooks but lets you easily remove the containers after cooking.
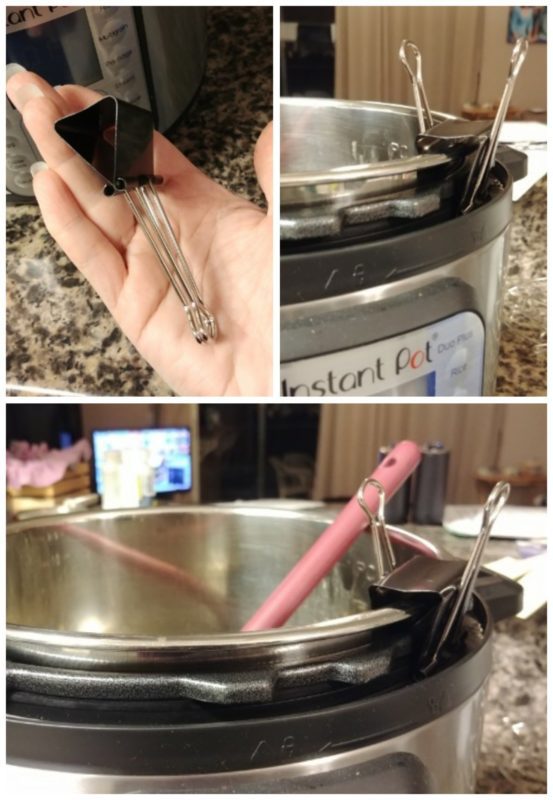
- Steal a gigantic binder clip from your office and use it to secure your liner to the edge. This keeps the pot from spinning while you stir and frees up your other hand. It’s a lifesaver!
- Your lid is machine washable. You should occasionally remove the sealing ring, splatter guard and pin according to the manufacturer’s directions for deeper cleaning, but the whole lid can go in the dishwasher right along with the pot.
- The rubber ring will absorb smells. Some people get an extra, using one for sweet stuff and one for savory. I use just one ring but do have to dunk it in vinegar water or leave it in the sun for a bit to really de-funkify it from time to time.
Lastly, here are some of my favorite recipes. Enjoy!
- Instant Pot Cool Ranch Chicken (I use store-bought seasonings and serve with taco toppings & shells, and Mexican or yellow rice)
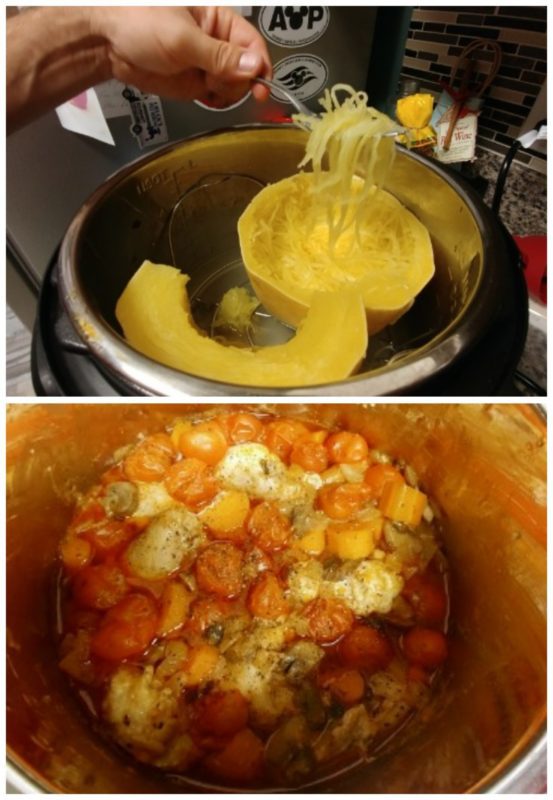
- Summer Italian Chicken (serve with spaghetti squash, which you cut in half, scoop out the guts, and cook on the trivet with a cup or two of water for 7 minutes on high pressure, QR – see picture above)
- Meatballs for every occasion – cook one or more bags of frozen meatballs with a cup of water in the bottom, 5 minutes high pressure, QR; for Hawaiian meatballs use 1 jar of BBQ sauce and a can of crushed pineapple instead of water; remember you can just add frozen fully-cooked meatballs to other recipes without cooking them separately
- Fried Rice
- Taco Pie
- Supreme Pizza Pasta
- Street Taco Take Along Salad
- Ground Beef & Rice Shawarma
- Quinoa with Cilantro & Lime Dressing
- New York Cheesecake (I would NEVER have attempted something like this before my Instant Pot!); top with blueberry compote to unlock bonus levels
- Chocolate lava cakes
- Rice Pudding
ENJOY YOUR INSTANT POT!


Wow! I did the frozen meatballs – pasta – jar of sauce, refilled with water down the side. 4 minutes. Turned out perfect, roommate was stoked on the taste – always good to have another opinion. I had some shredded parmesan. Put on top. Super yummy less than 30 minutes total.
Thank you so much! People should try this when they are looking for a simple starter recipe.
Glad to hear it went well! It’s a simple joy, but one of my favorite go-to dinners on a busy weeknight now. Even my kids can start it on their own, which is really helpful.
Thank you so much! This really helped a lot!
Happy to hear you liked it. Thanks for reading!
First love the Disney AP sticker in the background. Ive used the slow cooker, but I’m not sure of the settings. I tried to make my 14 bean and ham soup and the beans were still a bit hard. I did the same thing like I usually do with my crock. I used the less setting. Have you noticed this? I was wondering if the normal setting is more like the low setting on a crock. What have been your experiences. Got my Instapot over the summer, but this is the first time I used the slow cooker feature. I figured I would use it since I was home due to the snow. TIA!
Melissa, if you are using it as a slow cooker in order to replace your crock pot, then you should select the slow cooker setting and leave it on normal. If you need something done faster (which is why I would usually pick “high” on a crock pot, because I’m in a hurry and need it done in 4 hours instead of 6-8), you’re better off treating it like a regular pressure cooker, which will have it done way faster anyway. Hope that makes sense. Normal Slow Cooker on the IP, use for 6 – 8 hours. If you need it faster, pressure cook that sucker! LOL
I need a Recommendation on what brand Instant Pot to buy?! Where can I purchase one ?!
Well, I only know what I have and love. I use the 6 qt Instant Pot brand Duo Plus. They also make a “mini” 3 qt version, which is relatively new and perfect for people cooking for 2, or using it to travel so they can cook in their RV or hotel rooms. The 8 qt is obviously just bigger. There are a few levels of fanciness. Mine’s about in the middle. I can’t control it with my smart phone, but it has the buttons I like, such as the yogurt function. They are sold lots of places, but the most common are Amazon and Kohl’s.
There are other brands, but I can’t attest to their quality. But the Instant Pot (not “Instapot”) is the brand that’s making all the ruckus for being awesome. There are also “rice cookers”, which aren’t the same. And there are stovetop versions, but I use electric. Hope this helps!
Can you share your yogurt recipe? That’s what I want to try next.
That’s a short question with a surprisingly long answer.
I’m lazy and don’t own a good cooking thermometer, so I go with the cold-start or “no boil” method. Pour a container or two of Fairlife brand milk into the pot, whisk in a tablespoon or two of yogurt (I use Greek yogurt but it doesn’t have to be), close the lid and hit your Yogurt button. It will default to 8 hours, which you can adjust +/- to suit your tastes. More time makes it more tangy, less time makes it more mild/bland. The lid should be one but can be in either sealing or venting mode, it won’t get hot enough to matter. Some people strain it when it’s all done, others like it a little runny. The longer it “incubates”, the thicker it gets, too.
You can just do it all in the pot, or you can separate it into jars or bowls inside the pot so it’s already in single servings to chill later. Whatever floats your boat.
The longer, more complicated version is to boil regular milk to 180 degrees to kill off harmful bacteria and then cool it back down before adding your starter (or you’ll kill the good starter before it even gets started). Fairlife Milk doesn’t require this step because it’s ultra-pasteurized, ultra-filtered and sprinkled with fairy dust. Well, 2 out of 3 anyway. I buy mine at Publix, WalMart or Target on sale, because it’s not cheap. It expensive for milk but cheap for the amount of yogurt you get.
I’ve followed some great recipes from the Instant Pot guru “This Old Gal”. She taught me to make cheesecake from scratch in my IP, so I’m forever a fan. She does a pretty good job of explaining the cold start at the link below and also links there to the boil method that I’m not savvy enough to even try. Hope this all helps!
https://thisoldgal.com/instant-pot-no-boil-yogurt/
Yoooo where do I find that gumbo/Lowcountry boil recipe? You got the picture with all that delicious shrimp and sausage, but I need to know how to do that.
Yes, please share that recipe with the shrimp.
I put onion, 1 cup of broth, Old Bay and potatoes in the pot on high pressure for 4 minutes. Opened it and dumped in a package of frozen corn, a (cooked) smoked sausage link sliced up, and about a pound of frozen shrimp. Literally set it to cook zero minutes. As soon as it comes to pressure, it’s done! Too busy eating it to take pics of the finished product. But the juice left over was good enough to freeze in cubes to jazz up broths and soups in the future. For more exact recipes or variances, Google “instant pot shrimp boil”. Some call it a”low country boil”. Have fun!
Thx, on summer Italian chicken if I use breasts do I need to add extra liquid since no liquid is added in recipe?
Great question!! This is literally the ONLY recipe I’ve ever tried without adding a liquid to it. But it really does work, thanks mostly to the tomatoes. There is a surprising amount of liquid in those suckers! If you are nervous, though, you could probably add half a cup of water or broth without too much harm.
I have learned why people tend to cook with chicken thighs more than breasts. They stay tender in the cooker with less risk of overcooking. But if you’re using breasts (which I still do quite often), keep a mindful eye on their thickness. If you have big ones (bigger than 8 oz each), you may need to cut them in half to allow for adequate cooking. She does a pretty good job in the article part of her link explaining the tweaks you need for using different cuts. So that’s worth a full perusal.
Let me know how it turns out! And after a few months, let me know if you’ve been converted to thighs. LOL
When you say package of noodles for speg what size of package I did speg in my pot used to much and it was gummy had to use more liquid
My son doesn’t like spaghetti in general so we use other pastas, and I put in the whole box.
Because we’re a gluten free house for my daughter’s sake, our pasta shape options are limited to penne or rotini (the spiritual shaped noodles you see in the picture).
I’ve seen others post about actual spaghetti noodles, and it seems like you need to use the whole package. Using only half the noodles would require less liquid. Also, make sure you stir the whole pot AFTER opening it at the end, but before you judge if it’s runny. Some people see watery liquid still hanging out and close it to cook it more, or turn on sautee to try to cook off the liquid. That’s just going to overcook the pasta. Stir it really well and serve with a slotted spoon. Or even add some more sauce after opening if you really want it super thick.
To be honest, I personally would be willing to compromise the perfect sauce consistency for the convenience of one pot with no babysitting. The pasta itself is always great, so feel free to play with the sauce until you perfect it for your family.
Please share the recipe for the shrimp it looks so good!!!
I put onion, 1 cup of broth, Old Bay and potatoes in the pot in high pressure for 4 minutes. Opened it and dumped in a package of frozen corn, a (cooked) smoked sausage link sliced up, and about a pound of frozen shrimp. Literally set it to cook zero minutes. As soon as it comes to pressure, it’s done! Too busy eating it to take pics of the finished product. But the juice left over was good enough to freeze in cubes to jazz up broths and soups in the future. For more exact recipes or variances, Google “instant pot shrimp boil”. Some call it a”low country boil”. Have fun!